In the previous tutorial, we learned how to use Firebase and AngularJS to store and view data in Realtime database. In this tutorial, we’ll learn how to store, list, download and delete files in Firebase Cloud Storage using AngularJS
Cloud Storage
Cloud Storage is a storage service which stores files as ‘objects’. These objects are kept in containers called ‘buckets’. You can read, write and delete objects, save metadata and set security rules. It uses Google Cloud Storage at its backend.
Getting started
- Firstly, we need to get Firebase initialization code. To do so, refer to the instructions in the previous tutorial here.
- Select Storage from Develop section on the left-side and click Get Started. There will be a prompt about security rules. Click Got it.
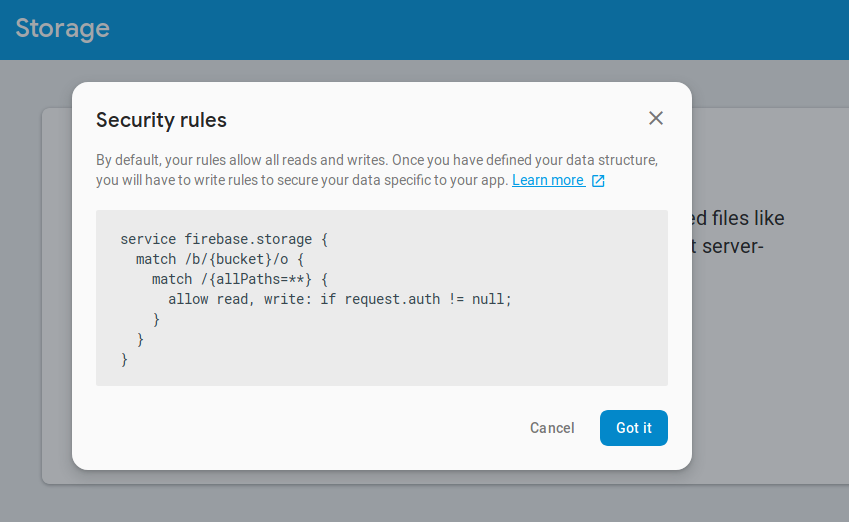
- Click Rules and change allow read/write permissions without requiring authentication. You can change these rules later.
service firebase.storage { match /b/{bucket}/o { match /{allPaths=**} { allow read, write: if true; } } } - Create index.html as follows and add the Firebase initialization code.
<!DOCTYPE html> <html ng-app="app"> <head> <meta charset="utf-8"> <meta name="viewport" content="width=device-width, initial-scale=1.0"> <title page-title></title> <link href='http://fonts.googleapis.com/css?family=Open+Sans:400,300,600,700' rel='stylesheet' type='text/css'> <link rel="stylesheet" href="https://cdnjs.cloudflare.com/ajax/libs/twitter-bootstrap/3.3.7/css/bootstrap.min.css" /> <link rel="stylesheet" href="https://cdn.datatables.net/1.10.16/css/dataTables.bootstrap.min.css" /> <style> body{ font-family:”Open Sans” , sans-serif } </style> </head> <body> <nav class="navbar navbar-inverse"> <div class="container-fluid"> <div class="navbar-header"> <a class="navbar-brand" href="#">Files</a> </div> </div> </nav> <script src="https://cdnjs.cloudflare.com/ajax/libs/jquery/3.3.1/jquery.min.js"></script> <script src="https://ajax.googleapis.com/ajax/libs/angularjs/1.6.1/angular.min.js"></script> <script src="https://www.gstatic.com/firebasejs/3.6.6/firebase.js"></script> <script src="https://cdn.firebase.com/libs/angularfire/2.3.0/angularfire.min.js"></script> <script src="https://cdnjs.cloudflare.com/ajax/libs/datatables/1.10.16/js/jquery.dataTables.min.js"></script> <script src="https://cdn.datatables.net/1.10.16/js/dataTables.bootstrap.min.js"></script> <script src="https://cdnjs.cloudflare.com/ajax/libs/angular-datatables/0.6.2/angular-datatables.min.js"></script> <script> // Initialize Firebase var config = { apiKey: ********************, authDomain: ********************, databaseURL:********************, projectId: **********************, storageBucket: **********************, messagingSenderId: **********************, }; firebase.initializeApp(config); </script> <script src="scripts/app.js"></script> <script src="scripts/controllers.js"></script> </body> </html> - Create app.js and import AngularFire and Datatables.
angular.module(app, [
        'firebase',
        'datatables'
    ])
Uploading a file
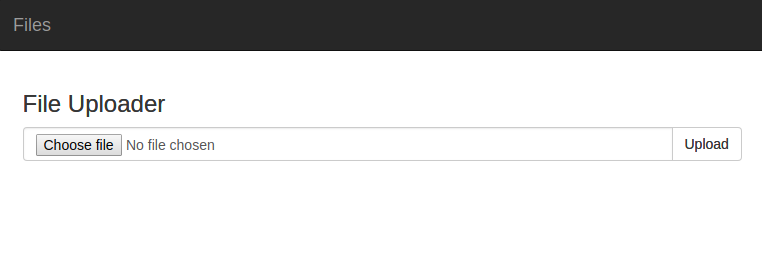
Step1: Add the file upload form to index.html
Here file input executes the onChange function when any file is selected. Upload function is called when the form submits.
 <div class="container">
   <div ng-controller="UploadCtrl">
    <form name="uploadForm" ng-submit="upload()">
      <h3>File Uploader</h3>
      <div class="input-group">
        <input onchange="angular.element(this).scope().onChange(this.files)" class="form-control" type="file" />
        <div class="input-group-btn">
          <button class="btn btn-default" type="submit">Upload</button>
        </div>
      </div>
    </form>
  </div>
</div>
Step2: Create controllers.js and add the following code:
function UploadCtrl($scope, $firebaseStorage, $firebaseObject) {

    let fileToUpload = null;
    $scope.onChange = function onChange(fileList) {
        fileToUpload = fileList[0];
    };
    $scope.upload = function() {
        if (fileToUpload) {
            let storageRef = firebase.storage().ref(fileToUpload.name);
            let storage = $firebaseStorage(storageRef);
            let uploadTask = storage.$put(fileToUpload);
            uploadTask.$complete((snapshot) => {
                let ref = firebase.database().ref("Files");
                let pushKey = ref.push().key;
                let formData = $firebaseObject(ref.child(pushKey));
                formData.name = fileToUpload.name;
                formData.timestamp = firebase.database.ServerValue.TIMESTAMP;
                formData.url = snapshot.downloadURL;
                formData.$save().then(() => {
                    angular.element("input[type='file']").val(null);
                    fileToUpload = null;
                })
            });
        }
    }
}

angular
    .module('app')
    .controller('UploadCtrl', UploadCtrl)
Explanation:
- onChange function sets the fileToUpload variable with the selected file.
let fileToUpload = null; $scope.onChange = function onChange(fileList) { fileToUpload = fileList[0]; }; - In the upload function, we create a Firebase Storage reference for the selected file. $firebaseStorage is a service provided by AngularFire. It takes in this reference to generate a $firebaseStorage object.
$scope.upload = function() { if (fileToUpload) { let storageRef = firebase.storage().ref(fileToUpload.name); let storage = $firebaseStorage(storageRef); - To upload the selected file, the fileToUpload variable to passed to $put method of $firebaseStorage object. $put uploads the file and returns an upload task object. This object is used to track the upload progress and pause/resume or cancel the upload. We are using the $complete method of the upload task to execute some code after the upload is successful.
let uploadTask = storage.$put(fileToUpload); uploadTask.$complete((snapshot) => { - Firebase does not provide any API to get the list of all files at a specific location. To get this list, we save the details of the uploaded file to the database when the file upload is successful.
We can later access the Files location in the database get the download URLs for the uploaded files. The file details are saved in a random push key generated by native Firebase SDK API. This is explained in the previous Firebase tutorial here.let ref = firebase.database().ref("Files"); let pushKey = ref.push().key; let formData = $firebaseObject(ref.child(pushKey)); - The details of the uploaded file are saved in the formData object created earlier. First, we set the name property using fileToUpload object. Then set the timestamp using firebase.database.ServerValue.TIMESTAMP. It is a Firebase feature where the value of the timestamp will be set automatically when the data is saved in database. Finally, we use the snapshot object returned by the $complete method to get the downloadURL of the uploaded file.
formData.name = fileToUpload.name;
formData.timestamp = firebase.database.ServerValue.TIMESTAMP;
formData.url = snapshot.downloadURL;
- Here we use the $save method of formData object to save file details in the database. After the file is saved, we reset the file input and set fileToUpload back to null.
formData.$save().then(() => {
                    angular.element("input[type='file']").val(null);
                    fileToUpload = null;
                })
Listing uploaded files
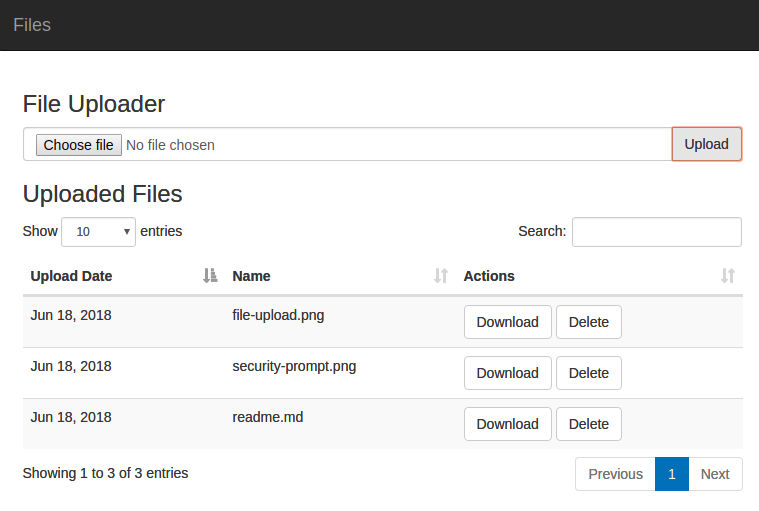
Step1: Add this to index.html, after div for UploadCtrl.
  <div ng-controller="tableCtrl">
    <h3>Uploaded Files</h3>
    <table datatable="ng" class="table row-border table-striped table-hover compact display">
    <thead>
      <tr>
        <th>Upload Date</th>
        <th>Name</th>
        <th>Actions</th>
    </tr>
    </thead>
    <tbody>
      <tr ng-repeat="(key,value) in files">
        <td>{{value.timestamp | date}}</td>
        <td>{{value.name}}</td>
        <td>
          <a href="{{value.url}}" class="btn btn-default" target="_blank">Download</a>
          <a href="#" class="btn btn-default" ng-click="delete(key, value.name)">Delete</a>
        </td>
      </tr>
    </tbody>
    </table>
  </div>
Here we have setup a datatable showing the upload date, file name and buttons to download or delete a file. File details are shown from files object created in tableCtrl.
Step2: Create tableCtrl in controllers.js
function tableCtrl($scope, $firebaseStorage, $firebaseObject){
    let fileRef = firebase.database().ref('Files');
    $scope.files = $firebaseObject(fileRef);
    $scope.delete = (key, name) => {
        let storageRef = firebase.storage().ref(name);
        let storage = $firebaseStorage(storageRef);
        storage.$delete().then(() => {
            delete $scope.files[key];
            $scope.files.$save();
        })
    }
}

angular
    .module('app')
    .controller('UploadCtrl', UploadCtrl)
    .controller('tableCtrl', tableCtrl)
Explanation:
- Reference is created to the Files location in database. Then data for all files is downloaded using $firebaseObject.
function tableCtrl($scope, $firebaseStorage, $firebaseObject){ let fileRef = firebase.database().ref('Files'); let storageRef = firebase.storage().ref(); $scope.files = $firebaseObject(fileRef); - This function deletes the file from Cloud Storage and removes it from database.
We get a reference to the file in Cloud Storage. Then we create a $firebaseStorage object using this reference. Finally we use the $delete method of $firebaseStorage to delete this file.
When the file is deleted, we remove the file from files object and save the changes back to the database.$scope.delete = (key, name) => { let storageRef = firebase.storage().ref(name); let storage = $firebaseStorage(storageRef); storage.$delete().then(() => { delete $scope.files[key]; $scope.files.$save(); }) }
This tutorial is now over. There are many features which you can explore further in its documentation. You can improve this app by adding a progress bar, better error handling, file previews and more. Check out the documentation from references given below.