We are developing a community website application where we have different profiles of the user and their information. These profile types are not limited we want to add a new profile whenever we want and they have their own question. SocialEngine is one of the best tools to develop an online community. It is highly manageable, flexible and scalable and user-friendly. SocialEngine is best suited for our requirement that’s why we have decided to go with the SocialEngine. But we stuck at a point where we need a socialengine autocomplete profile question, which is out of the box in SocialEngine.
We have decided to add a form element in the form but later on, we realize that whenever we add a new profile type we need a SocialEngine developer to customize the solution which is not a good approach. We want a dynamic solution like First Name or Gender(that already exist) field in SocialEngine. So the problem is how we create this type of element so that it can be added dynamically as a question of the different profile type. To find the best solution we have uses the following approach this might helps others.
Step1. Register a new form element: First, we need to register our new element with SocialEngine. Add the following code inside the application/modules/Fields/settings/fields.php
 'jobposition' => array(
        'base' => 'text',
        'label' => 'Job Position',
        'category' => 'specific',
 ),
Step2. Create your form element: Now create your element, Navigate to the application/modules/Fields/Form/Element and create a file Jobposition.php. Here my element name is ‘jobposition’. In the following code, we are creating a autocomplete field element which derived from Text element type.
class Fields_Form_Element_Jobposition extends Engine_Form_Element_Text{
    public function init()
    {

        $this->setAttrib('module', 'sciencejnr');
        $this->setAttrib('controller', 'article');
        $this->setAttrib('action', 'jobposition');
    }

    public function loadDefaultDecorators()
    {
        if( $this->loadDefaultDecoratorsIsDisabled() )
        {
            return;
        }

        $decorators = $this->getDecorators();
        if( empty($decorators) )
        {
            $this->addDecorator('JobPositionWrapper');
            Engine_Form::addDefaultDecorators($this);
        }
    }
}
Step3. Create a decorator: Now we have to create a decorator class to render the new element in the form. Navigate to the application/libraries/Engine/Form/Decorator and create a file jobPostionWrapper.php and add the following code.
class  Engine_Form_Decorator_JobPositionWrapper extends Zend_Form_Decorator_Abstract
{
    /**
     * Default placement: surround content
     * @var string
     */
    protected $_placement = null;

    /**
     * Render
     *
     * Renders as the following:
     *
     * @param  string $content
     * @return string
     */
    public function render($content)
    {
        $elementName = $this->getElement()->getName();

        $url = $this->getElement()->getAttrib('url');
        $module = $this->getElement()->getAttrib('module');
        $controller = $this->getElement()->getAttrib('controller');
        $action = $this->getElement()->getAttrib('action');
        if( $url ) {
            $this->getElement()->setAttrib('url', null);

        }
        if( $module ) {
            $this->getElement()->setAttrib('module', null);
        }
        if( $controller ) {
            $this->getElement()->setAttrib('controller', null);
        }
        if( $action ) {
            $this->getElement()->setAttrib('action', null);
        }
        $view = $this->getElement()->getView();
        return $view->partial('suggest/suggest.tpl', 'fields', array(
            'name' => $elementName,
            'url' => $url,
            'element' => $this->getElement(),
            'module' => $module,
            'controller' => $controller,
            'action' =>$action
        ));

    }
}
Step4. Create a tpl file to add an HTML and javascript static code: Here is the example of html code. Navigate to the application/modules/Fields/views/scripts/suggest and create a file suggest.tpl and add the following to the tpl file:
$this->headScript()
    ->appendFile($this->layout()->staticBaseUrl . 'application/modules/Seaocore/externals/scripts/autocompleter/Autocompleter.js');
$elementName = $this->name;
$module = $this->module;
$ctl = $this->controller;
$action = $this->action;
$element = $this->element;
$name = explode('_', $elementName);
Html:

Javascript:
        new Autocompleter.Request.JSON(element, '', {
            'minLength': 1,
            'delay' : 250,
            'selectMode': 'pick',
            'autocompleteType': 'message',
            'multiple': false,
            'className': 'message-autosuggest',
            'filterSubset' : true,
            'tokenFormat' : 'object',
            'tokenValueKey' : 'label',
            'elementValues': 'toValues',
            'injectChoice': function(token){
                //console.log(token);
                var choice = new Element('li', {
                    'class': 'autocompleter-choices friendlist',
                    'id':token.label
                });
                new Element('div', {
                    'html': this.markQueryValue(token.label),
                    'class': 'autocompleter-choice'
                }).inject(choice);
                this.addChoiceEvents(choice).inject(this.choices);
                choice.store('autocompleteChoice', token);
            }
            , onPush : function(){
                $('').setStyle('display', 'none');
                //$('-toVales-wrapper').setStyle('display', 'block');
                $('').disabled = true;
            }
        });
    function removeFromToValue(id,id2,id3,id4) {
        // code to change the values in the hidden field to have updated values
        // when recipients are removed.
        var toValues = $(id4).value;
        var toValueArray = toValues.split(",");
        var toValueIndex = "";
        var checkMulti = id.search(/,/);

        // check if we are removing multiple recipients
        if (checkMulti!=-1){
            var recipientsArray = id.split(",");
            for (var i = 0; i < recipientsArray.length; i++){
                removeToValue(recipientsArray[i], toValueArray, id3);
            }
        }
        else{
            removeToValue(id, toValueArray, id3);
        }

        // hide the wrapper for usernames if it is empty
        if ($(id3).value==""){
            $(id4+'-wrapper').setStyle('height', '0');
        }

        $(id3).disabled = false;
        $(id3).setStyle('display', 'block');
       // $(id4+'-wrapper').setStyle('display', 'none')
    }
    function removeToValue(id, toValueArray, id4){
        for (var i = 0; i < toValueArray.length; i++){
            if (toValueArray[i]==id) toValueIndex =i;
        }
        toValueArray.splice(toValueIndex, 1);
        $(id4).value = toValueArray.join();
    }
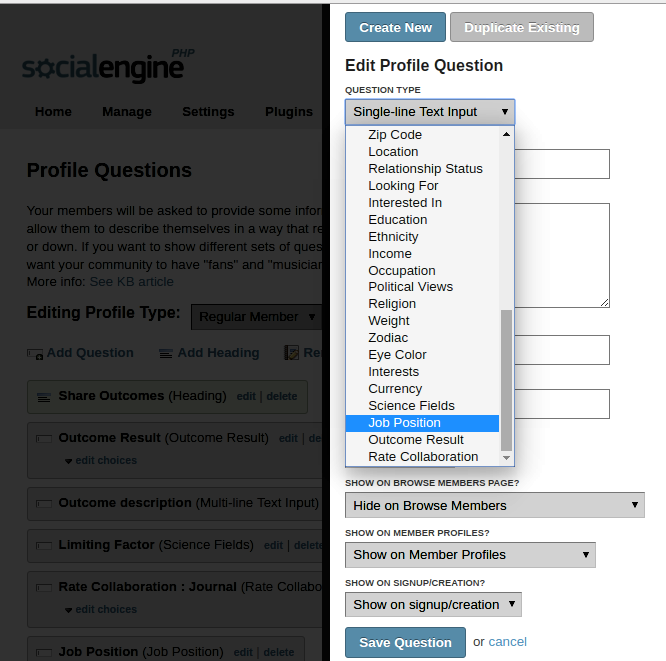
Step5. Now add this new element type as profile question: To add question to the profie type use the default approach of SocialEngine. Selectt the job posiotn while selecting the question type as shown in the image:

And in the form this will show you like this:

Conclusion:
This article explains creating a autocomplete form element in socailEngine so that we can create socialengine autocomplete profile question for the profile types. Autocomplete is the most used form elements nowadays due to less input error. It suggests the user enter a valid data. If any better approach or solution your thought are most welcome. Please share with us so that it might help others aswell.
Reference:
SocialEngine
Zend
Best way to import bulk users into SocialEngine


