In our previous article, We discussed about the migrating users from websites to socialengine online community using CSV import. This solution is relevant only if you want to migrate users for socialengine but this solution won’t work if you want to migrate users from online community to oxwall website. CSV data importer plugin allows you to quickly move users from multiple platform to oxwall community along with the more user information.
Oxwall don’t provide a way to import users with google map location and profile photo, we tried to use third party plugin but it only imports few data. One of our client are looking more information of the users like google map location and profile photo at the time of migrating. We need customize CSV data importer plugin which enable users to import google map location and profile photo. Also need to integrate with the third party Googl Map Location plugin for show the google map location.
Basically there are two way to migrate users from one website to another:
- Migrate user manually:
It very difficult to migrate user manually one by one because there is bulk of users available. - Migrate user automatically:
Migrate user from CSV file into website is quite easy, because it will migrate bulk users in few minutes
Limitation of CSV data importer Plugin
The basic problem of CSV data importer is that it migrate users from csv into website with only basic information of a user like username, e-mail, birthday, and age. But our client wants more information of users like google map location, age range, account type, profile photo etc. The existing plugin unable to integrate with GeoMap plugin for show google map location.
Customize Oxwall plugin to import locations and photos
So we have customize the CSV data plugin according to the client requirements, which enables admin to migrate bulk users with more user information from CSV into website without loss of user data in few minutes. Now the customized plugin enable user to integrate with Geomap plugin of oxall for show the google map location.
This article demonstrate how to customize the CSV data Plugin:
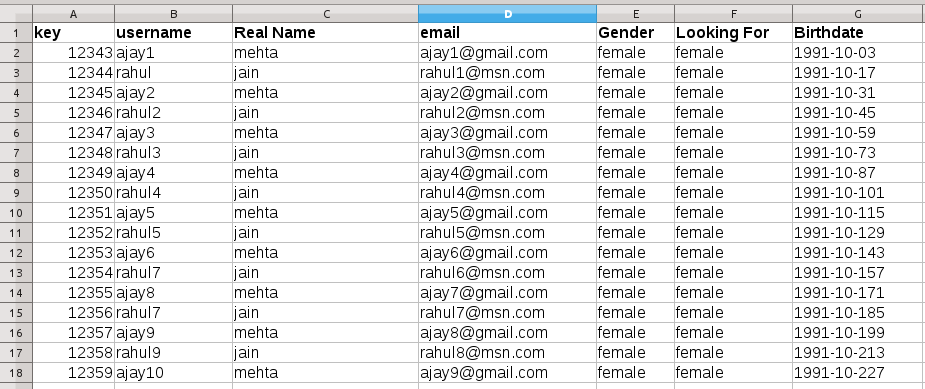
Step1: First we need to create a CSV file with fields which is required in migration. Below is the format of CSV file.

Step2: For save value of user profile photo, age range , account type in question_data table. For Google map location we have used the Geomap Location plugin. We have used the following code to to save user values in question_data table:
public function import() {
    $dumpUsers = $this->getDumpUsers ();
    foreach ( $dumpUsers as $user ) {
    //import user method
      if (($newUser = $userService->importUser( strtolower ( preg_replace ( '/[^w]/', '_', $user->$username ) ), $_password, $user->$email, $gender )) instanceof BOL_User && $importConfigs ['options']->generatePassword)
      {
        $this->sendPasswordLetter ( $newUser->id, $_password, $newUser->email );
      }
      //defile the data array
      $data = array ();

      //save value in question data table one by one
      foreach ( $fields as $key => $field ) {
        $data ['match_age'] = $minimum_age . '-' . $maximum_age;
        $importaddress = $city . ',' . $state . ',' . $country ;
        $data ['googlemap_location'] = $importaddress'
        $file_name = $user->field0;
        $uploadedFileName = "http://www.smoopies.com/dev/profile_pics/" . $file_name . "_0.jpg";
        $avatar=$avatarService->setUserAvatar ( $userId, $uploadedFileName);
        BOL_QuestionService::getInstance ()->saveQuestionsData ( $data, $userId);
      }
    }
}
Step3: Integrate with google map Location plugin
Now we need to save the imported address in google map location table. For that purpose we have use the Google Map Key in the google map url to generate the latitude, longitude and formatted address of the imported address and save these information in the google location table. Below are the code for save value of imported address in the google map location table:
public function GeoLocation($user_id, $import_address, $zip) {

		$address = $import_address;

		$details_url = "https://maps.googleapis.com/maps/api/geocode/json?address=$address";

		$ch = curl_init ();
		curl_setopt ( $ch, CURLOPT_URL, $details_url );
		curl_setopt ( $ch, CURLOPT_RETURNTRANSFER, 1 );
		$geoloc = json_decode ( curl_exec ( $ch ), true );

		$country = 'US';
		$address = $geoloc ['results'] [0] ['formatted_address'];
		$lat = ( float ) $geoloc ['results'] [0] ['geometry'] ['location'] ['lat'];
		$lng = ( float ) $geoloc ['results'] [0] ['geometry'] ['location'] ['lng'];
		$northeastlat = ( float ) $geoloc ['results'] [0] ['geometry'] ['bounds'] ['northeast'] ['lat'];
		$northeastlng = ( float ) $geoloc ['results'] [0] ['geometry'] ['bounds'] ['northeast'] ['lng'];
		$southeastlat = ( float ) $geoloc ['results'] [0] ['geometry'] ['bounds'] ['southwest'] ['lat'];
		$southeastlng = ( float ) $geoloc ['results'] [0] ['geometry'] ['bounds'] ['southwest'] ['lng'];
		$json = json_encode ( $geoloc ['results'] );
		$this->saveLocation ( $zip, $country, $address, $lat, $lng, $northeastlat, $northeastlng, $southeastlat, $southeastlng, $json );

		$location = new GOOGLELOCATION_BOL_Location ();
		$location->entityId = $user_id;
		$location->countryCode = $country;
		$location->address = $address;
		$location->lat = $lat;
		$location->lng = $lng;
		$location->northEastLat = $northeastlat;
		$location->northEastLng = $northeastlng;
		$location->southWestLat = $southeastlat;
		$location->southWestLng = $southeastlng;
		$location->json = $json;
		$location->entityType = GOOGLELOCATION_BOL_LocationDao::ENTITY_TYPE_USER;
		GOOGLELOCATION_BOL_LocationService::getInstance ()->save ( $location );

		return $address;
}
Step4: Create user one by one from CSV file. We have used the following code to create user:
public function importUser( $username, $password, $email, $gender)
{
    	$joinStamp= mt_rand(1388552400,1420002000);
    	$user = new BOL_User();

    	if($gender == "female"){
    		$userAccountType = "8cc28eaddb382d7c6a94aeea9ec029fb";
    	}
    	elseif ($gender == "male"){
    		$userAccountType = "808aa8ca354f51c5a3868dad5298cd72";
    	}
    	else {
    		$userAccountType = "1301fca1a46f0bff7f21a3ffa0db3aad";
    	}
    	$user->username = trim($username);
    	$user->password = BOL_UserService::getInstance()->hashPassword($password);
    	$user->email = trim($email);
    	$user->joinStamp = $joinStamp;
    	$user->activityStamp = time();
    	$user->accountType = $userAccountType;
    	$user->joinIp = ip2long(OW::getRequest()->getRemoteAddress());

    	$this->saveOrUpdate($user);

    	BOL_AuthorizationService::getInstance()->assignDefaultRoleToUser($user->id);

    	return $user;
    }
Conclusion
This blog is going to help you in migrate users information from multiple platform users into Oxwall community. We can migrate a number of users into oxwall community with the help of customizing the CSV data importer plugin which enables users:
- To migrate bulk users with more user information into the website.
- Very less time required to import bulk users from CSV into website.
- No data loss while migrating users.
- Integrate CSV Date importer Plugin with Geomap Plugin.
Feel free to contact us if you have any further queries.
