Recently we were working on a project for Lifesherpa, a behavioral training app. They use a third party service which does not provide an extensive enough API to start some background jobs and get their status. This work needs to be done at a regular schedule. So, we needed to find a solution which would start the job automatically. It should also send email notifications to make it convenient to see the status of the job. So, we looked into various browser automation tools that are available. Since we use Firebase Functions to create APIs, the solution has to be compatible with Firebase. There are many options available for Node.js but we finally settled with Puppeteer as it is supported by Google. Firebase Functions have added support for running Headless Chrome with Node 8 engine. So, there are no compatibility issues.
Introduction to Puppeteer
Puppeteer is a Node.js library by Google. It allows you to programatically control Google Chrome or Chromium to interact with websites. You can do many things with it such as web scraping, take screenshots, generate PDFs, create UI tests, automate form submission and much more. Puppeteer uses a special version of Chrome called Headless Chrome. The only thing different from the regular version is that you can use it without showing the UI. This makes it easy to run Chrome on devices which don’t have a display. You can write your automation code in Puppeteer once and deploy it on your server to run without user interaction.
In this tutorial, we will go through the basics of using Puppeteer to monitor a website and send email notifications. Then, we will deploy it on Firebase Functions. Finally, we can call its API URL using cron jobs as required.
For testing, I have setup a demo site which has two pages:
- Login page: Enter username and password to login
- Dashboard page: There is a ‘Start Process’ button. Clicking it will randomly display a success or failure response after a short delay. This is for simulating an API response.
You can get the code used in this tutorial in the GitHub repository here.
Steps:
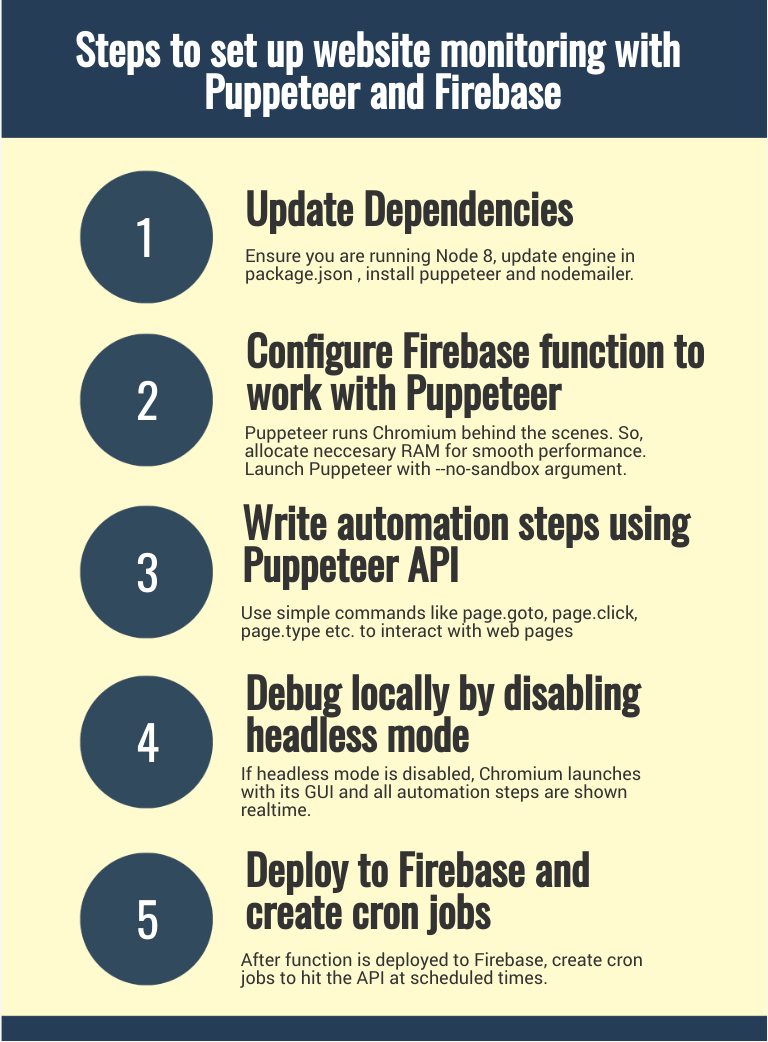
Step 1: Check Dependencies:
First of all ensure that you are running Node 8 in your local machine. If not, then upgrade it.
Also, update firebase-functions and firebase-admin packages to the latest version.
npm install firebase-functions@latest firebase-admin@latest –save
To use Puppeteer on Firebase you need to enable Node 8 for your function. To do so, go to package.json file and add following:
"engines": {
    "node": "8"
}
Install puppeteer and nodemailer
npm install puppeteer nodemailer
It will automatically download the latest version of Chromium which is compatible with Puppeteer. Thus, no compatibility issue can arrise.
Also, we will use nodemailer to send email notifications for errors.
Step 2: Create monitor function
Create index.js file with the following code. It might look complex but it will be easy to understand with the explanation given below.
const functions = require('firebase-functions');
const admin = require('firebase-admin');
const puppeteer = require('puppeteer');
const nodemailer = require('nodemailer');

admin.initializeApp();

const config = {
	navigationTimeout: 40000,
	login: {
		url: "https://pragmaapps.github.io/puppeteer-tutorial/public/",
		targets: {
			username: "#username",
			password: "#password",
			submit: "#submit"
		},
		form: {
			username: "abcdefg",
			password: "123456"
		}
	},
	dashboard: {
		targets: {
			startProcess: "#startProcess",
			notification: ".alert"
		}
	},
	//Replace with your smtp server details
	smtp: {
		host: "https://abcdefg.com",
		port: 465,
		secure: true,
		user: "user123",
		pass: "pass123",
		from: "[email protected]",
		to: "[email protected]"
	}
}

exports.monitor = functions.runWith({ memory: '512MB' }).https.onRequest(async (req, res) => {

	try {
		const browser = await puppeteer.launch({
			args: ['--no-sandbox'],
			headless: true
		}).catch(customError("Failed to start Chrome"));

		const page = await browser.newPage()
			.catch(customError("Failed to open new page"));

		await page.goto(config.login.url)
			.catch(customError("Failed to open login page"));

		console.log("Opened login page: " + config.login.url);

		await page.type(config.login.targets.username, config.login.form.username)
			.catch(customError("Failed to type username. Page did not load completely or the selector for username has changed."));

		await page.type(config.login.targets.password, config.login.form.password)
			.catch(customError("Failed to type password. Page did not load completely or the selector for password has changed."));

		await Promise.all([
			page.waitForNavigation(config.navigationTimeout, {
				waitUntil: "networkidle0"
			}),
			page.click(config.login.targets.submit)
		]).catch(customError("Failed to login or failed to redirect after login"));

		console.log("Logged in successfully");

		await page.click(config.dashboard.targets.startProcess)
			.catch(customError("Failed to click Start Process button. The selector has changed or page did not load fully"));
		await page.waitForSelector(config.dashboard.targets.notification)
			.catch(customError("Notification not received or selector for notification has changed"));

		const result = await page.evaluate((config) => document.querySelector(config.dashboard.targets.notification).innerText, config)
			.catch(customError("Failed to extract message from page"));

		console.log("Result: " + result);
		await browser.close()
			.catch(customError("An issue occured while trying to close the browser."));
		console.log("Closed browser window");

		if (result.search("Failed") !== -1) {
			throw {
				result: "Process status result shows that it did not complete successfully",
				error: {
					message: result
				}
			};
		}

		return res.send({
			result: "No errors found"
		});

	} catch (customError) {
		console.error("An error occured.");
		console.error(customError);
		await sendEmail(customError);
		return res.status(500).send(customError);
	}

});

// Create custom error object so that only one try/catch is needed to handle all errors
function customError(result) {
	return (error) => {
		if (!error) {
			error = {};
		} else {
			error = {
				message: error.message,
				stack: error.stack
			}
		}
		throw { result, error };
	}
}

async function sendEmail(response) {

	try {
		const reportDate = new Date().toUTCString();
		const error = JSON.stringify(response.error, null, 2);
		const html = `<body>
			<h3>Error Date ${reportDate}</h3>
			<p>Info: ${response.result}</p>
			<pre>${error}</pre>
		</body>`;

		console.log("Generated HTML");
		console.log(html);

		const { from, to, host, port, secure, user, pass } = config.smtp;
		const transporter = nodemailer.createTransport({
			host,
			port,
			secure,
			auth: {
				user,
				pass
			}
		});
		await transporter.sendMail({
			from,
			to,
			subject: `Monitor Status: Error found`,
			html
		});
		console.log("Email sent successfully");

	} catch (error) {
		console.error("failed to send email");
		console.error(error);
	}
}
Explanation:
1. Prepare Configuration
const config = {
	login: {
		url: "https://pragmaapps.github.io/puppeteer-tutorial/public/",
		targets: {
			username: "#username",
			password: "#password",
			submit: "#submit"
		},
		form: {
			username: "abcdefg",
			password: "123456"
		}
	},
	dashboard: {
		targets: {
			startProcess: "#startProcess",
			notification: ".alert"
		}
	},
	//Replace with your smtp server details
	smtp: {
		host: "https://abcdefg.com",
		port: 465,
		secure: true,
		user: "user123",
		pass: "pass123",
		from: "[email protected]",
		to: "[email protected]"
	}
};
config object contains details about selectors, form inputs and SMTP configuration for sending email. All this is saved in config to make it easy to edit them without looking into the code below.
exports.monitor = functions.runWith({ memory: '512MB' }).https.onRequest(async (req, res) => {
We can increase the memory alloted to the function by specifying the memory in functions.runWith. Also, you can choose from 128MB, 256MB, 512MB, 1GB and 2GB.
async means that this function uses the new async/await syntax. It allows using promises without .then() . Likewise, try/catch is used for error handling instead of .catch().It makes asynchronous code look like synchronous code. You can read more about async/await here.
// Create custom error object so that only one try/catch is needed to handle all errors
function customError(result) {
	return (error) => {
		if (!error) {
			error = {};
		} else {
			error = {
				message: error.message,
				stack: error.stack
			}
		}
		throw { result, error };
	}
}
This is a helper function. It allows adding customised error messages to any error. So, instead of writing multiple nested try/catch for all promises, we can just create a custom error object, add our human readable error string and re-throw it. The catch block at the end will catch the error and send notifications with the custom message. Thus, making the code look clean and easy to understand.
try {
	const browser = await puppeteer.launch({
		args: ['--no-sandbox'],
		headless: true
	}).catch(customError("Failed to start Chrome"));
It is starts a browser instance. Configure two things here:
- args: [‘–no-sandbox’] – Disable Chromium’s sandbox because Firebase currently does not support running Headless Chrome with sandbox.
- headless: true – It’s optional. This setting is true by default. But if it is set to false, Chromium will start with its GUI. Thus, is helpful for debugging purposes.
2. Write automation code
const page = await browser.newPage()
	.catch(customError("Failed to open new page"));
It opens a new tab in Chromium.
await page.goto(config.login.url)
	.catch(customError("Failed to open login page"));

console.log("Opened login page: " + config.login.url);
page.goto navigates the browser to a URL.
await page.type(config.login.targets.username, config.login.form.username)
	.catch(customError("Failed to type username. Page did not load completely or the selector for username has changed."));

await page.type(config.login.targets.password, config.login.form.password)
	.catch(customError("Failed to type password. Page did not load completely or the selector for password has changed."));
page.type enters text into input boxes. This requires entering the CSS selector of the required element in page.type . It can fail when the input element is not rendered yet in the browser due to slow internet or the selector for the element has been changed by the website.
await Promise.all([
	page.waitForNavigation(config.navigationTimeout, {
		waitUntil: "networkidle0"
	}),
	page.click(config.login.targets.submit)
]).catch(customError("Failed to login or failed to redirect after login"));

console.log("Logged in successfully");
page.click clicks on any HTML element. It can fail if the element does not render in time or the selector for the element has changed.
page.waitForNavigation stops processing while the page is loading after a navigation event. It gives timeout error if the navigation does not complete in required time.
Also, page.waitForNavigation needs to be added in a Promise.all with page.click if the click event starts any navigation event.
await page.click(config.dashboard.targets.startProcess)
	.catch(customError("Failed to click Start Process button. The selector has changed or page did not load fully"));
await page.waitForSelector(config.dashboard.targets.notification)
	.catch(customError("Notification not received or selector for notification has changed"));
After dashboard page loads, click “Start Process” button. Then we wait for the result of the process. To do so, page.waitForSelector is used. It halts the function till an element with the specified selector is created in the DOM.
const result = await page.evaluate((config) => document.querySelector(config.dashboard.targets.notification).innerText, config)
	.catch(customError("Failed to extract message from page"));

console.log("Result: " + result);
page.evaluate allows you to execute custom JavaScript on websites running in the browser. Use it for data scraping and analysing the data in a webpage. To use any variable from outside, pass the variable as argument to page.evaluation. This variable then becomes accessible from inside the browser. Then, store any value returned from the callback function into results.
After the processing is complete, the notification element contains info regarding the success/failure of the process. We save the notification text in result.
await browser.close()
	.catch(customError("An issue occured while trying to close the browser."));
console.log("Closed browser window");
browser.close stops the browser session.
if (result.search("Failed") !== -1) {
	throw {
		result: "Process status result shows that it did not complete successfully",
		error: {
			message: result
		}
	};
}
If the result of processing contains the word “Failed”, then throw an error to send notification for it.
3. Send email notifications
async function sendEmail(response) {
const reportDate = new Date().toUTCString();
const error = JSON.stringify(response.error, null, 2);
const html = `<body>
	<h3>Error Date ${reportDate}</h3>
	<p>Info: ${response.result}</p>
	<pre>${error}</pre>
</body>`;
Create HTML for the email with date and error details.
const { from, to, host, port, secure, user, pass } = config.smtp;
const transporter = nodemailer.createTransport({
	host,
	port,
	secure,
	auth: {
		user,
		pass
	}
});
Use SMTP details to create a Nodemailer transporter object.
await transporter.sendMail({
	from,
	to,
	subject: `Monitor Status: Error found`,
	html
});
As you can guess, sendMail sends the email to the specified recipients. You can specify multiple recipients by separating them using commas. These are just the basics of what you can do with Nodemailer. To know about more features, go to its documentation here.
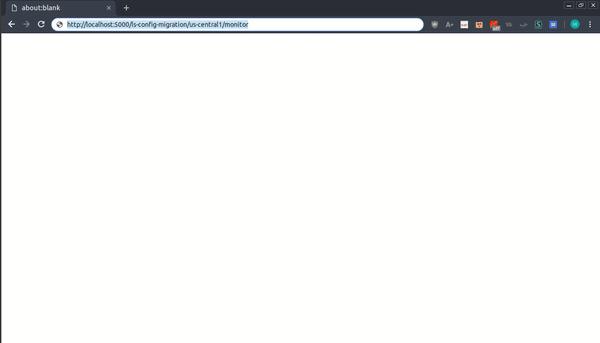
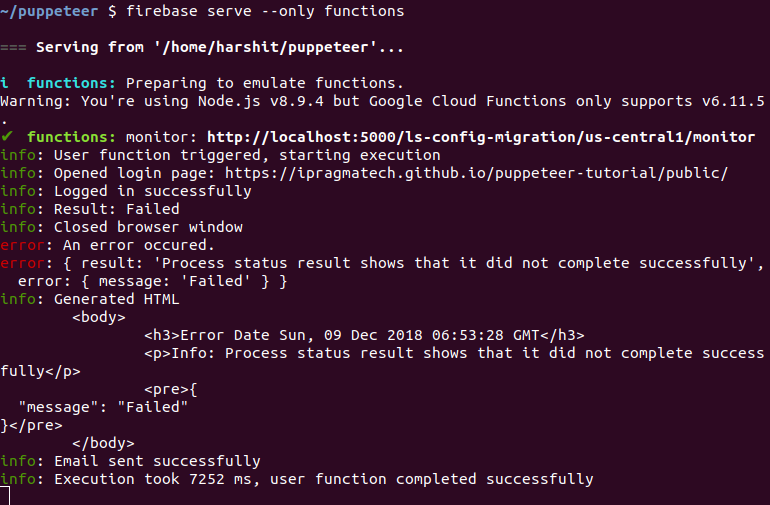
Step 3: Start Firebase local emulator:
To test the monitor function, open the project directory in terminal and type
firebase serve --only functions
It will provide a local URL for the function. Go to the URL in your web browser and observe the logs in the terminal while the process finishes. If any error occurs, you will receive an email notification for it.
Set “headless: false” in puppeteer.launch() function call. Now start the monitor function again. This time, Puppeteer will start the GUI of Chromium and show the automation process in realtime. So, if you face any issues in headless mode, you can debug them by using visual feedback from the GUI.
Step 4: Deploy to Firebase
Finally, to deploy to Firebase, run
firebase deploy --only functions:monitor
After you get its API endpoint, you can use a cron job service such as cron-job.org, easycron etc. to hit this endpoint at scheduled times. You will get email notifications automatically if there is any issue in the results.
Conclusion
Thus Puppeteer is a very easy to use library to automate various tasks with Chrome. You can combine it with testing libraries like mocha and jest and create extensive UI tests. Or you can write a scrapper which goes through all pages in a website and converts them into PDFs. Or you can automate things in websites which don’t provide any API. The possibilities are endless. Start experimenting and see what it can do for you.