Do you want people to click on your blog posts when others share them on Facebook, LinkedIn and Google+?. Is your blog optimized for the best visual display when people share your content?. Are your posts are accompanied by a nice picture with an accurate description so they stand out in social media streams?
Why Does This Matter?
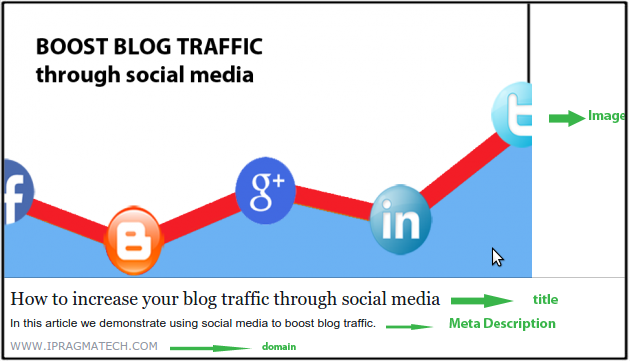
When a link to your post is accompanied by an image and description, it’s more likely that people will click on that link to read the content behind it and share it.There’s an element that lets you control how your post appears in a status update.It’s called a “social snippet“. You can manage these social snippets and improve social shareability when you add a few tags to the HTML code on your website or blog.
In this article I’ll examine social snippets and show you how to control the images that accompany your posts when they appear in status updates on Facebook, LinkedIn and Google+.
Anatomy of a Social Snippet
Social snippets vary slightly depending on where they’re shared. It’s useful to examine how they look on each social platform.
Facebook Social Snippet
The Facebook social snippet is a combination of the page title, description and image.
LinkedIn Social Snippet
Like Facebook, LinkedIn status updates include a title, description and image. Here’s how the LinkedIn social snippet works.
Google+ Social Snippet
The Google+ social snippet also has a title, description and image.
How to Add the Tags to Manage Social Snippets ?
If links to your content don’t show an image, title or description when you publish them in your status updates on Facebook, LinkedIn or Google+, you can fix it by adding tags into the HTML code of your document.Use one of the tagging methods below to add the appropriate tags so links to your content will show the right image in any status update.
#1: Use Title and Meta Description Tags
You’ll need to work with some of the title and meta description tags on your blog post. Social snippets in all social networks use these two page elements:
<title>…</title>
<meta name=”description” content=”…” />
These also control the snippets in search engine listings, so they’re important for SEO best practices. Make sure to use them with search in mind, as well as social.
#2: Use “Open Graph Protocol” Tags
Facebook, Google+ and LinkedIn all use Open Graph standards for tagging content. Add these tags to set the image in status updates:
<meta property=”og:image” content=”/image.jpg” />
Open Graph tags can also be used to set the title and description.
<meta property=”og:title” content=”…” />
<meta property=”og:description” content=”…” />
#3: Use Image_SRC Meta Tags
For Facebook, you can use the image_src meta tag between the and tags to manage the images in social snippets.
<link rel=”image_src” href=”http://www.example.com/image.jpg” />
If you add more than one of these links for more than one image, the person who shares will have a choice of images to use in the snippet.
How Do I Manage All of These Tags? Where Do They Go?
Some of these tags go in the of the HTML, and others go in the . Here’s a quick guide showing how to put the tags into the right places so your posts look great when shared in social networks. Contact your web developer if you need assistance.
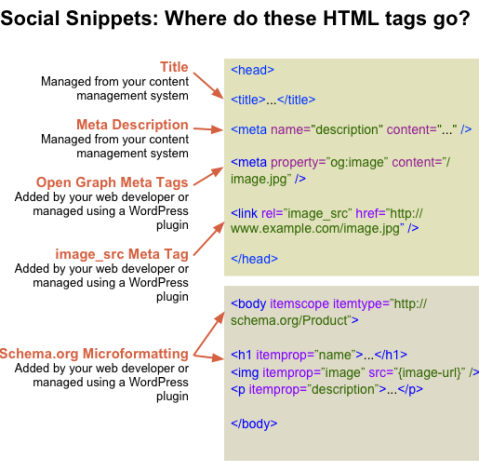
The tags that drive social snippets appear in several places in the HTML.
Conclusion
What do you think? Have you used any of these tagging methods to manage how your content appears in social media streams? What changes in engagement have you noticed? Share your thoughts and observations in the comments below.